Faraday in the software development process – GitLab – Part 4

For a while we have been explaining how easily is to integrate our Faraday instance to our development process of Python applications integrated with Heroku. In our last posts, we did this using GitHub Actions, Jenkins, and Travis CI.
Today we are going to implement this using the cloud version of GitLab CI/CD and we will add a new use SonarQube as a new code scanning tool.
As we did in the last post, we are going to assume that you already have a python repository in some git server that already is setup using Heroku. You can read our first post if you want to know how to set this and get more context.
GitLab can be used in two ways: one of them is on-premises version which requires to be installed in your own infrastructure and the other is the cloud version. We are going to focus only on the cloud version because all the GitLab setup and runners setup is not important for this document.
The reader must know that this post will focus on the .gitlab-ci.yml file, how to configure it to be read, executed and integrated with our Faraday instance easily, avoiding custom configurations. However, we suggest you to read the GitLab CI/CD guide to understand completely how this tool works.
Lastly, we will assume that the reader already knows how SonarQube works and we are going to focus only on the required configuration to be integrated with our Faraday instance.
Step 1: Creating the .gitlab-ci.ylm file
If you read the previous posts, you probably already understand how these CI/CD tools mostly work. Usually they require to create a file in the root of your project with an specific name, and GitLab is not the exception.
We are going to create a new file in the root of our project called .gitlab-ci.yml. This file will tell GitLab all the steps that needs to execute to build, deploy, and scan our app, and how to upload the scanning results to Faraday.

We will start writing the following on this new file:
image: docker:latest
services:
- docker:dind
stages:
- build
- deploy
- test
- uploadvariables:MOUNT_POINT: /builds/$CI_PROJECT_PATH/output
We will explain what we did in the previous lines and what means each one.
This is really similar to what we did with Travis CI in the previous post:
– image: All the pipelines that runs on GitLab runs on docker. You can define what docker image you want to run your pipeline with this keyword. In our case, we are using a special docker image that contains a docker instance inside because we need to execute docker build and docker run later. If you want to know more about the image keyword you can read the official documentation.
– services: This keyword let you declare required services for your pipeline like mongodb, redis, etc. We need to enable the docker command inside our docker mage, so we will need the docker:dind service. This can change depending on your specific project, so we suggest you to read the official documentation.
– stages: This keyword lets you define all the stages that our pipeline will have. GitLab has 5 default stages but you can redefine them as you want. Each job will need to declare to what stage belongs, but by default it will belong to test stage. You must to know that all the jobs running on specific stage will run in parallel and the stages will run sequentially. For more information we suggest you to read the official documentation.
– variables: As we did in Travis CI, you can define environment variables inside this file and in the GitLab Project too. Here we are defining the $MOUNT_POINT variable because we need to link docker filesystems later. Probably you have noticed that we are using a predefined GitLab environment variable called $CI_PROJECT_PATH. We suggest you to read the official documentation with all the predefined GitLab variables.
Step 2: Defining the jobs
Let’s define the jobs for each stage:
image: docker:latest
services:
- docker:dind
stages:
- build
- deploy
- test
- upload
variables:
MOUNT_POINT: /builds/$CI_PROJECT_PATH/output
build:
stage: build
script:
- apk update
- apk upgrade
- apk add curl jq python3 python3-dev build-base libffi-dev libressl-dev gettext
- curl -O https://bootstrap.pypa.io/get-pip.py
- python3 get-pip.py
- python3 -V
- pip install virtualenv
- virtualenv venv
- source venv/bin/activate
- pip install -r requirements.txt
- mkdir -p $MOUTN_POINT
- bandit -r $CI_PROJECT_PATH -f xml -o $MOUNT_POINT/flaskapp_faraday_bandit.xml --exit-zero
- docker run --rm -e SONAR_HOST_URL=$SONARQUBE_URL -e SONAR_LOGIN=$SONARQUBE_TOKEN -v /builds/$CI_PROJECT_PATH:/usr/src sonarsource/sonar-scanner-cli -Dsonar.organization=$SONARQUBE_ORGANIZATION -Dsonar.projectKey=$SONARQUBE_PROJECT
artifacts:
paths:
- $MOUNT_POINT/flaskapp_faraday_bandit.xml
deploy:
stage: deploy
script:
- build
script:
- apk update
- apk upgrade
- apk add git
- git remote rm heroku || true
- git remote add heroku https://heroku:$HEROKU_API_KEY@git.heroku.com/$HEROKU_APP_NAME.git > /dev/null
- git push heroku HEAD:master -f
vuln-checking:
stage: test
script:
- docker pull owasp/zap2docker-stable
- docker run -u root -v $MOUNT_POINT:/zap/wrk/:rw --network=host -t owasp/zap2docker-stable zap-baseline.py -t $ZAP_SCAN_URL -x flaskapp_faraday_zap.xml || true
artifacts:
paths:
- $MOUNT_POINT/flaskapp_faraday_zap.xml
upload-results:
stage: build
script:
- apk update
- apk upgrade
- apk add git curl
- curl -u "$SONARQUBE_TOKEN:" $SONARQUBE_URL/api/issues/search\?componentKeys\=$SONARQUBE_PROJECT\&types\=VULNERABILITY\&p\=1\&ps\=500 > $MOUNT_POINT/flaskapp_faraday_sonarqube.json # ATTENTION: You should iterate if total < 500 (page size)
- docker build https://github.com/flopezluksenberg/docker-faraday-report-uploader.git -t faraday-uploader
- export CURRENT_DATE=${date+'%Y-%m-%d'}
- docker run --name faraday-uploader --rm -v $MOUNT_POINT:$MOUNT_POINT -e HOST=$FARADAY_URL -e USERNAME=$FARADAY_USERNAME -e PASSWORD=$FARADAY_PASSWORD -e WORKSPACE=$CI_PROJECT_NAME-$CURRENT_DATE-$CI_COMMIT_SHORT_SHA -e FILES=$MOUNT_POINT/flaskapp_faraday_zap.xml faraday-uploader
- docker run --name faraday-uploader --rm -v $MOUNT_POINT:$MOUNT_POINT -e HOST=$FARADAY_URL -e USERNAME=$FARADAY_USERNAME -e PASSWORD=$FARADAY_PASSWORD -e WORKSPACE=$CI_PROJECT_NAME-$CURRENT_DATE-$CI_COMMIT_SHORT_SHA -e FILES=$MOUNT_POINT/flaskapp_faraday_bandit.xml faraday-uploader
- docker run --name faraday-uploader --rm -v $MOUNT_POINT:$MOUNT_POINT -e HOST=$FARADAY_URL -e USERNAME=$FARADAY_USERNAME -e PASSWORD=$FARADAY_PASSWORD -e WORKSPACE=$CI_PROJECT_NAME-$CURRENT_DATE-$CI_COMMIT_SHORT_SHA -e FILES=$MOUNT_POINT/flaskapp_faraday_sonarqube.json faraday-uploader
It seems large but if you read what we did it is almost the same that we did in the previous posts but with some changes related to this tool.
We need to mention that some commands will be repeated over different stages. This happens because each stage runs independently.
We need to mention that the test stage will execute after the deploy stage because we are meaning to test the running application with Zap.
Let’s explain each job and each concept that appears while we are reading as we did in our previous posts.
Step 2.1: Build Job
This is the first job to execute. As you can see, we’ve defined that this job belongs to build stage, so you may realize that we can change the job of the name if you want
When we began this post we said that we are using a docker image to run all the jobs. That means that maybe we don’t have all the required tools in the image and maybe we need to install some of them
To do that, we need to execute the first 3 commands: pk update, apk upgrade, apk <command list to install>.
Then, to wrap up this job, we installed python 3 and virtualenv. After that we executed bandit as we did in previous posts.
Is important to mention that the artifact keyword allows us to expose some files as a result of the job and lets us share files between stages (remember that we’ve said that each stage is independent). In this case we’ve saved the generated file in the directory defined on $MOUNT_POINT. This sharing file system between stages happens on GitHub Actions too if you remember.
Lastly, as you can see, we’ve executed a sonar scanning using some environment variables that we will define later. In this case our project doesn’t have direct integration with sonar because we don’t have a sonar-project.properties file created, so we used the cli to pass required data as organization and project key. If your project already is integrated with SonarQube, you can avoid those variables.
Step 2.2: Deploy Job
We began this job installing git command. We need git because our app will be deployed to Heroku and we use git to do that (This is the same that we did in our previous posts).
Again we’ve used two variables that need to be defined in the GitLab Project: HEROKU_API_KEY and HEROKU_APP_NAME. We will explain how to configure it later.
Step 2.3: vuln-checking Job
This job is pretty simple because we just downloading the docker zap image, executing it, and we are saving the result file to $MOUNT_POINT/flaskapp_faraday_zap.xml.
You can see again that we are using another environment variable that we will define later called $ZAP_SCAN_URL.
Lastly, we are publishing the result file using the artifacts keyword as we did in the build stage.
Step 2.3: upload-results Job
It only remains to upload the generated files by bandit, zap, and SonarQube to our Faraday instance.
We began this job installing git and curl. We need git command because it is used to download the custom docker image that we will use later.
Now, we need to pay attention. The curl command is downloading the SonarQube generated issues in the first job because we need them to upload to our Faraday instance. There are important notes about this:
- At the moment of write this post, sonar-scanner-cli doesn’t allow us to save the result in a file. The result is uploaded to your SonarQube instance automatically.
- So, to obtain those issues we need to make a request to the SonarQube API.
- This API was developed to create this kind of integration, and that is the reason that a paginator exists. This paginator can bring you up to 500 elements.
- IMPORTANT NOTE: We are avoiding to validate if the received issues length is greater than the page size and iterating to retrieve the missing issues because this is just an example for educational purposes. You need to make sure to retrieve all the issues when you integrate your Faraday instance with SonarQube.
Then, we’ve created the known variable $CURRENT_DATE that we used for the workspace name. Finally, we upload the files.
At this point we need to mention all the GitLab predefined variables and some custom variables used before:
The GitLab predefined variables we’ve used are the following:
- $CI_PROJECT_NAME: It is the project name
- $CI_COMMIT_SHORT_SHA: In previous posts we’ve used the build number to create the workspace but GitLab doesn’t have that variable, so we’ve decided to replace it with this one.
The custom variables used here are the following:
- $FARADAY_URL
- $FARADAY_USERNAME
- $FARADAY_PASSWORD
- $SONARQUBE_URL
- $SONARQUBE_TOKEN
- $SONARQUBE_PROJECT
Step 3: Creating custom environment variables in GitLab
Before executing our pipeline we need to create our custom environment variables that we’ve used along with all the content of the .gitlab-ci.yml file. In our case, as we mention in the introduction, we are using the GitLab cloud version.
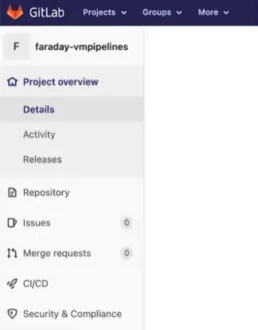
To do this we need to go to our repository on GitLab that probably is https://gitlab.com/<username>/<respository name>/ . Once there, we need to go to Settings → CI/CD located at left menu
In this page we can configure a lot of features of this tool. In this case we will expand the Variables section.

Once there we have the option Add Variable. When you click there you will see the following modal where you can add your environment variable key and value.
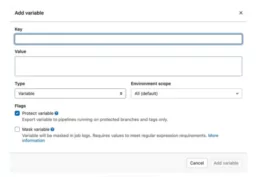
Once you’ve added all the environment variables, you will see something like this:

Steps 3.1: SonarQube variables
We’ve used 4 variables related to SonarQube configuration.
As we explained before, our project doesn’t has SonarQube integration because it doesn’t has the sonar-project.properties file, and that is the reason that we’ve added the variables $SONARQUBE_ORGANIZATION y $SONARQUBE_PROJECT.
The $SONARQUBE_URL variable is the SonarQube URL host that need to be expose to internet.
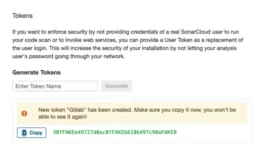
Finally, the $SONARQUBE_TOKEN variable can be obtained through the SonarQube client, and it is used to upload results and query the search API. To obtain this token you need to go to your SonarQube host and go to My Account -> Security -> Tokens. In this page you need to pick a name for your new token and click on Generate Token. Then you will see something like the following:
Now you can add this variable to the GitLab Pipeline.
That’s all, you can commit and push your .gitlab-ci.yml file and see the execution.
Step 4: Checking the final results
The GitLab UI is pretty simple. To see our pipeline execution we need to go to CI/CD → Pipelines on the left menu that we’ve shown before.
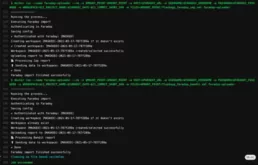
Once there, if all was as we expected, you will see something like this:
If you click on pipeline out, the last job will look as this:
And that ‘s all. Now we can see our new workspace in Faraday:
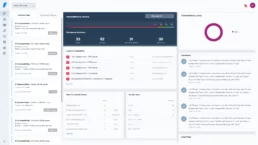
If we enter to Manage section we will see the detected vulns:

Conclusions
Generally, GitLab is pretty simple to setup at least on the clod version and even more if we’ve done this before in GitHub Actions, Jenkins, and Travis CI.
We want to mention what useful are the faraday plugins and the variety it has because the SonarQube integration took only some new lines in our pipeline file,
Useful links
App Vuln Management: Integrating Faraday in the software development process — Part 3
App Vuln Management: Integrating Faraday in the software development process — Part 2
App Vuln Management: Integrating Faraday in the software development process — Part 1
Docker Faraday Report Uploader
Example repository (branch: GitLab)
Download all of our DevSecOps papers right here
Related Posts
Using Faraday API for Vulnerability Management
Within our team, we prefer to focus on specific tasks depending on the type of host and the associated vulnerabilities. Exploiting a…

Ten years of cybersecurity, a lifetime of hacking.
Faraday was born from the fusion of entrepreneurial spirit and a desire to break staffs. These elements naturally emerged in Federico…

Good practices in Cybersecurity – Part 1
Pentesters use a comprehensive and complete toolkit to expose different platforms and evaluate the security of an IT infrastructure. They…