Bypassing passwords and getting a shell through UART in a Wi-Fi router
We started out by trying to connect to the router via UART and found out that it asks for a username and password in order to log in. We made many attempts using well-known credentials, but we decided that it was time to resort to static analysis in an attempt to find out the correct password.
Obtaining the firmware
As usual, we downloaded the firmware from the vendor’s website and ran Binwalk on it. Unfortunately Binwalk was unable to recognize any file format, so we get the impression that it might be encrypted somehow. In order to verify it, we decided to run Binwalk’s built-in entropy analysis on the downloaded image. The results are shown below:
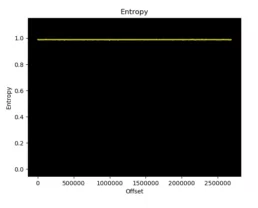
This means that the image had a constant (and high) entropy value, which means that the image was most likely encrypted. But, since we did have physical access to the device, Emilio was able to desolder the EEPROM chip from the board and read its contents. With this newly dumped firmware image, we made one more attempt to run Binwalk on it and, sure enough, it was now able to recognize the contents and extract the entire filesystem!
Figuring out the password
The first thing we did was to dump the /etc/shadow file and try to crack the hash. We succeeded but this password was not accepted by the UART login prompt. Judging from this behavior we concluded that there must be something else going on with this firmware, so we decided to take a look at the rest of the filesystem and see if we could find anything suspicious.
Login credentials’ validation
After taking a look at /etc/init.d/rcS we found that a binary called console_password runs after the initiation sequence is over. We were surprised to find that this binary had not been stripped from its symbols. In fact, all binaries had symbols! (thanks NEC for making our job easier). Here is a simplified version of the decompiled binary (the main function only):
char user_pwd_buff[1024];
int user_ok;
printf("Login: ");
gets(user_pwd_buff);
// (1)
user_ok = strncmp(user_pwd_buff, "root_cheeper", 13) == 0;
// (2)
printf("Password: ");
gets(user_pwd_buff);
// (3)
if ( !user_ok ) goto HANG;
apmib_get(16102, pwcrypt_arg1);
apmib_get(202, mib202);
sprintf(pwcrypt_arg2,"%.2hhx%.2hhx%.2hhx%.2hhx%.2hhx%.2hhx", mib202[0], mib202[1], mib202[2], mib202[3], mib202[4], mib202[5]);

if ( pipe(pipe_fd) < 0 ) {
    puts("pipe error");
    return -1;
}
pid = fork();

if ( pid < 0 ) {
    puts("fork error");
    close(pipe_fd[0]);
    close(pipe_fd[1]);
    return -1;
}

if ( pid ) {
    close(pipe_fd[1]);
    read(pipe_fd[0], valid_pwd, 1024);
    v14 = (_BYTE *)strchr(valid_pwd, '\n');
    if ( v14 ) *v14 = 0;
    close(pipe_fd[0]);
} else {
    close(pipe_fd[0]);
    close(1);
    dup(pipe_fd[1]);
    execlp("pwcrypt", "pwcrypt", pwcrypt_arg1, pwcrypt_arg2, 0);
}

pwd_not_ok = strncmp(user_pwd_buff, valid_pwd, 1024);

// (4)
if ( pwd_not_ok ) {
    while ( 1 ) sleep(60);
}

return 0;
This might seem like a lot of code but most of it is really straightforward (we can safely ignore everything between the comments (3) and (4) for now). The gist of it is that a username gets read from stdin (1) and then checked against the string stdin (3) and checking it against some buffer (4). If any of the checks fail, then the program goes into an infinite loop (at the HANG label). Of course, what we would like to know is the exact value of the string in valid_pwd, which will be compared to the password read from stdin.
We now have to bring our attention to what’s going on between (3) and (4). Long story short, it is just executing apmib_get and reading its output into a buffer. What this means is that there must be a binary called
Sure enough, we found the /bin directory of the filesystem. Moreover, we found the following strings defined within it:
"invalid argument !!"
"pwcrypt version %d.%d.%d\n"
"pwcrypt [product name] [wan mac address(12byte)]"
So this process of password-generation is dependent on one more binary, called
If we continued the analysis as we’ve been doing so far, we would now turn our attention to the
Let’s turn our attention once more to the code listing for
apmib_get(16102, pwcrypt_arg1);
apmib_get(202, pwcrypt_arg2);
sprintf(pwcrypt_arg2,"%.2hhx%.2hhx%.2hhx%.2hhx%.2hhx%.2hhx", mib202[0], mib202[1], mib202[2], mib202[3], mib202[4], mib202[5]);
// …
execlp("pwcrypt", "pwcrypt", pwcrypt_arg1, pwcrypt_arg2, 0);
What this is telling us is that apmib_get is somehow in charge of retrieving device-related values from non-volatile memory. This functionality is oddly related to the one we expected from apmib_get function. Given all of that context it does make sense to go and look at
Digging into libapmib
We decided to take a look at apmib_get works. Luckily, as we had debug symbols, we were able to see this at the beginning of the function (note that we have named the parameters because we can infer their semantics from the previous usages of this function):
int apmib_get(int numeric_id,int *out) {
    // local variable declarations...
    if (func1(numeric_id,&mib_table,&local_24))) {
        Var0 = &mib_table;
    } else if (func1(numeric_id,&hwmib_table,&local_24))) {
        Var0 = &hwmib_table; }
        // more code...
With this information we noticed that there is a table in memory which stores information related to the integer keys we saw previously (for instance, from looking at apmib_get begins looking for a requested id.
After inspecting how these tables are laid out in memory we noticed the following pattern:
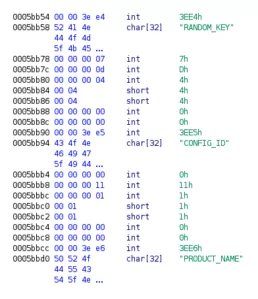
Note that we’ve already added some typing information, which we’ve figured out by taking a look at how the elements of this table were being used within apmib_get.
After defining the appropriate types, the code ended up looking like this:
int apmib_get(int numeric_id,int *out) {
    // local variable declarations
    if (get_tbl_idx(numeric_id,&mib_table,&idx))) {
        metadata_tbl = &mib_table;
        data_tbl_ptr_ptr = &pMib
    } else if (get_tbl_idx(numeric_id,&hwmib_table,&idx))) {
        metadata_tbl = &hwmib_table;
        data_tbl_ptr_ptr = &pHwSetting;
    }

    metadata_tbl_entry = &metadata_tbl[idx];
    data_tbl_ptr = *data_tbl_ptr_ptr;
    switch (metadata_tbl_entry->type) {
        // ...
    case 7:
        *(_DWORD *)result = *(_DWORD *)(data_tbl_ptr + metadata_tbl_entry->offset);
        // ... } // more code
We added a lot of information to this listing, so we will need to talk a little bit about where all of this came from.
– We knew that the 3rd field of each entry in the table indicated the type of the entry because, depending on its value, the value of result gets set in different ways.
– We also know that the first field is the id because it is the value being compared with the first input parameter (which if you recall, indicates the key to be searched).
– Finally, as you can see from the 7th case inside the switch, the data being copied to result comes from adding the 4th field of the entry to a given pointer that we named data_tbl_ptr. This is why we decided to call this field `offset`.
In the snippet above, we included only the 7th case of the switch because this is the entry type of RANDOM_KEY, which looks suspiciously similar to HW_RANDOM_KEY from earlier (in fact, when you use flash get to retrieve HW_RANDOM_KEY, flash stripes the HW_ prefix and just looks for RANDOM_KEY in hwmib_table).
After figuring all of this out, we were only missing the actual value of RANDOM_KEY. We knew that it is located at offset pHwSetting, but we were missing that table’s contents.
In order to get the contents of that buffer, we took a look at all the functions where pHwSetting is being used, and found that it was being referenced from apmib_get, apmib_set, apmib_update, apmib_init, apmib_init_HW. Out of those functions, the ones that seemed more likely to give us a hint about the contents of pHwSetting were the ones that contained init in the name. We quickly realized that they were both calling a function named apmib_hwconf, which seemed to be populating the buffer.
After reverse engineering apmib_hwconf for a while we managed to discover that the contents of the buffer were being uncompressed from flash and copied to RAM. After managing to decompress this image, we were able to read the value of RANDOM_KEY using the previously defined offset. In order to automate this process, we wrote a custom tool which you can find here
Putting it all together
Let’s do a recap of what we have done so far:
- To get a shell on the device, a binary called
flash get HW_RANDOM_KEYto retrieve the random key from flash.- And we knew the value that
flash get HW_RANDOM_KEYshould return in order to generate the valid password, because we managed to uncompress the settings stored in flash memory and calculate the offset at which the 4-byte random key is supposed to reside.
In other words, we have everything we need to calculate the correct password ourselves. We just needed to set up an environment which allows us to execute MIPS binaries, and some way to fake flash memory access.
The first task was easily achieved using qemu user mode and HW_RANDOM_KEY. Then, we executed
The exact process can be seen in this video
らくらくshellスタート!
After all this effort, Emilio noticed that there was a QR code on the back of the device. It turns out that people upload photos of their devices and redact the information they consider sensitive, for example the default WiFi password.
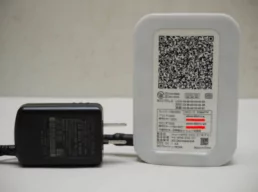
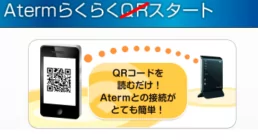
But Emilio found out that the QR code contains a lot of information. If you scan it with your cell phone, it will lead to a page designed to speed up your setup: Easy QR start (らくらくQRスタート).
The thing is that in order to set up the device, the URL conveys a lot of information. Guess what information is there, among other things… The HW_RANDOM_KEY, the WAN mac address and the device name! So only by scanning this QR Code, we could have generated the shell password without dumping any firmware. We made another tool to automate this process, which you can find here
Credits:
Related Posts
Using Faraday API for Vulnerability Management
Within our team, we prefer to focus on specific tasks depending on the type of host and the associated vulnerabilities. Exploiting a…

Our COO Martín Tartarelli talks about Vulnerabilities at UCEMA
Last week, our COO, Martin Tartarelli, offered a master class on vulnerabilities. He thoroughly explained what they are, how they work, and…

Ten years of cybersecurity, a lifetime of hacking.
Faraday was born from the fusion of entrepreneurial spirit and a desire to break staffs. These elements naturally emerged in Federico…