Automating Security Tasks
In this second part (part one), we will show a step by step of a security analysis having in mind a basic methodology:
– Perform a passive recognition of the target
– Go through an active recognition
– Identify vulnerabilities coming from an automatic scanning
– Exploit these vulnerabilities
– Wrap up with an executive report
In each of these instances, we will work on automating, as they represent repetitive tasks. By automating, we gain valuable time and focus on what’s important.
When working on an offensive consultancy project, there are three different approaches you may work with:
BlackBox
The team has limited information about the target. For example, they only count with the domain or the company name they are auditing.
GreyBox
In this case, the team has partial information about the target. For example, they might have a list of subdomains, information about architecture, or credentials to audit applications.
WhiteBox
Last but not least, in the third approach, the team has all the information they need to start auditing the target, such as complete infrastructure ranges, access to app source code, app credentials, etc.
For this post we will focus on the first approach, the BlackBox one. And apply the methodology previously mentioned. We will go through every step and see how you can resolve them using Faraday.
Passive recognition
In this particular phase, we will imagine a scenario where we only have the domain to start working: https://vulnweb.com
Plenty of tools allow you to start identifying the subdomains and widening the attack surface with only providing the domain information. Just like:
– Sudomy
– Aquatone
– Subfinder
– DNSGen
– Sublist3r
In this preliminary stage, we will choose sudomy, a useful and simple tool. If we want to automate this tool, we must first understand what the tool has to offer and the output it provides. With all this information we will be able to start working.
If you haven’t heard about this tool, you can go to their GitHub and check the installation process, independent from SO, and use it through Docker.
| ➜ ./sudomy -d vulnweb.com -rS -pS –takeover -gW |
Sudomy will create the results on the identified subdomains inside the output directory. Even if you use other parameters, like httprobe or nmap, the information will be available anyway.
In this phase, we only need to collect subdomains and focus on the new file subdomain.txt.
antivirus1.vulnweb.com
autoconfig.demo.vulnweb.com
blogger.com.vulnweb.com
httptestaspnet.vulnweb.com
live2.vulnweb.com
mailer2.vulnweb.com
odincovo.vulnweb.com
printer2.vulnweb.com
remus.vulnweb.com
rest.vulnweb.com
restasp.vulnweb.com
tera.vulnweb.com
test.php.vulnweb.com
test.vulnweb.com
testap.vulnweb.com
testaps.vulnweb.com
testapsnet.vulnweb.com
testasp.vulnweb.com
testaspnet.vulnweb.com
testaspx.vulnweb.com
testhtml5.vulnweb.com
testphp.vulnweb.com
tetphp.vulnweb.com
virus.vulnweb.com
viruswall.vulnweb.com
vulnweb.com
web5340.vulnweb.com
www.dealer.vulnweb.com
www.test.php.vulnweb.com
www.testasp.vulnweb.com
www.testphp.vulnweb.com
www.virus.vulnweb.com
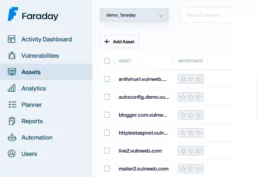
With this first result, we already realize the attack surface is bigger than we thought, Isn’t it? Now that we have this kind of information, we can start working with Faraday on the following tasks:
– Organize the results from multiple tools
– Have a better and more direct visualization of the information
– Understand every asset we will audit
Faraday will handle everything I need. I can upload all these subdomains from sudomy and also other inputs from multiple tools and have it all organized in one place.
Faraday allows you to upload the results from different tools. You can upload reports, XML files, or any other format you prefer. But instead of doing it manually we will automatize it with faraday-cli, making the whole process easier.
faraday-cli is the official client of Faraday for automating recognition tasks, vuln analysis, workflows, and more. In this case, we already have the tool we want to automatize, what we aim to do and the output. So what we need to do is:
– Read the subdomains from the output of sudomy.
– Go through the list
– Upload the assets to Faraday
Installing Faraday-cli on your terminal
First, we must install faraday-cli on the computer and authenticate with Faraday’s platform. https://github.com/infobyte/faraday-cli
– Installation from pip:
– pip install faraday-cli
– Installation from the source:
– git clone https://github.com/infobyte/faraday-cli.git
- cd faraday-cli
- pip install .
| ➜ faraday-cli auth
Faraday URL [https://myworkspace.faraday.com]: https://myworkspace.faraday.com Validate SSL certificate for [https://myworkspace.faraday.com] (Y, N) [Y]: User: faraday Password: ******* Saving config ✔ Authenticated with Faraday: https://myworkspace.faraday.com |
Uploading the first results
As we mentioned earlier, we should first identify the results, organize that information and upload it to Faraday.
| ➜ cat subdomain.txt
antivirus1.vulnweb.com autoconfig.demo.vulnweb.com blogger.com.vulnweb.com httptestaspnet.vulnweb.com live2.vulnweb.com […] |
Secondly, we have to read that file automatically and for each one, upload the identified host to Faraday:
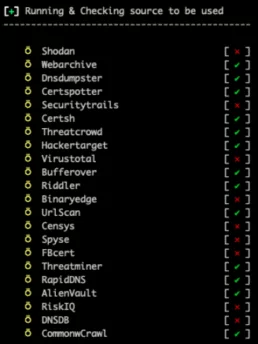
| ➜ for host in $(cat subdomain.txt); echo ‘[{“ip”: “‘$host'”, “description”: “‘$host'”}]’ | faraday-cli host create –stdin -w demo_faraday –resolve
Created host { “description”: “antivirus1.vulnweb.com”, “vulns”: 0, “type”: “Host”, “owner”: “faraday”, “versions”: [], “ip”: “antivirus1.vulnweb.com”, “default_gateway”: “”, “credentials”: 0, “importance”: 0, “owned”: false, “name”: “antivirus1.vulnweb.com”, “severity_counts”: { “critical”: null, “host_id”: 74100, […] |
What we want to achieve with the for is to iterate over the subdomains list and then run faraday-cli to upload each of them. The final result should look pretty much like this image:
Active recognition
The main purpose of these tasks is mainly to enlarge the attack surface we are analyzing. Our starting point was a particular domain; and now we are working with a bigger list of the infrastructure. In this phase, we aim to identify which ports and services on the identified applications are exposed. To do so, we will use nmap. You can download it right here
In order to automate this second phase, we have to:
– Download the IPs/domain lists that we uploaded in Faraday.
– Load them as arguments in nmap and scan their ports/services.
– Upload the results to Faraday again.
This can also be automatize from our terminal like this:
| ➜ faraday-cli host list -ip -w demo_faraday | nmap -iL – -oX /tmp/nmap_results.xml && faraday-cli tool report /tmp/nmap_results.xml
Starting Nmap ( https://nmap.org ) Stats: 0:00:36 elapsed; 0 hosts completed (31 up), 31 undergoing Connect Scan Connect Scan Timing: About 0.18% done Discovered open port 80/tcp on 44.238.29.244 Discovered open port 80/tcp on 44.228.249.3 […] 📄 Processing Nmap report ⬆ Sending data to workspace: demo_faraday ✔ Done |
Nmap will identify the IPs from each subdomain we analyze. So now we will have that information available for any tests:
Vulnerability analysis
To wrap this first phase of automation, we will scan a subdomain that seems interesting:
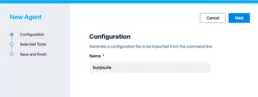
To do so, we will register an agent on the Faraday instance. An agent is a connector that allows us to add one or more tools to Faraday platform and be able to interact with it inside our terminal.
Faraday provides native support for a wide range of tools. Now we will focus our attention on BurpSuite and use its plugin (for this action, we need to use the BurpSuite Professional License, since it exposes the API needed for the plugin).
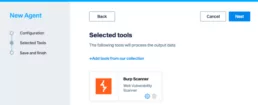
The small wheel will allow us to set up parameter for the Burp API:
– BURP HOST: Our Burpsuite server.
– BURP API KEY: the APIKEY to consume the Burpsuite.
– PULL INTERVAL: the interval we will apply to refresh information.
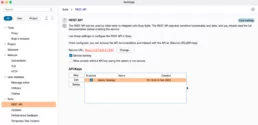
All of these configurations are included in the setting section of Burpsuite: Settings -> Suite -> REST API
Once we registered the agent, we have to install faraday-dispatcher in our PC so that we can interact with it:
| $ pip3 install faraday_agent_dispatcher |
Lastly, we need to connect the agent from our console
| faraday-dispatcher run –token=360503 |
With all our set up ready, we should be able to activate our agent from the command line:
| $ faraday-cli agent run -a 1 -e burp -p \”{“NAMED_CONFIGURATION”:”Crawl and Audit – Fast”,”TARGET_URL”:”http://testphp.vulnweb.com”}’\’ -w demo_faraday |
Below you will find the explanation of each parameter so that you can understand each part of the command:
– agent run: command from faraday-cli to activate the agent.
– -a: the agent’s ID. To recognize all the agents that are implemented you can apply faraday-cli agent list.
– -e: Name of the executer
– -p: in JSON format, the set up parameter of the agents
– NAMED_CONFIGURATION: the configuration of the Burpsuite policy. In this link you will find information on each one.
– TARGET_URL: the URL to audit.
– -w: the name of the workspace.
| ➜ faraday-cli agent run -a 1 -e burp -p \”{“NAMED_CONFIGURATION”:”Crawl and Audit – Fast”,”TARGET_URL”:”http://testphp.vulnweb.com”}’\’ -w demo_faraday
Running executor: burpsuite/burp Parameters: {“NAMED_CONFIGURATION”:”Crawl and Audit – Fast”,”TARGET_URL”:”http://testphp.vulnweb.com”} Generated Command: [2613] |
This will automatically run the Burpsuite agent:
| – faraday_agent_dispatcher – INFO {MainThread} [dispatcher.py:264 – run_once()] Parsing data: {“execution_ids”: [26], “agent_id”: 1, “workspaces”: [“demo_faraday”], “action”: “RUN”, “executor”: “burp”, “args”: {“NAMED_CONFIGURATION”: “Crawl and Audit – Fast”, “TARGET_URL”: “http://testphp.vulnweb.com“}
[…] [dispatcher.py:416 – run_once()] Running burp executor |
Once the agent finishes, the results will be uploaded to Faraday automatically.
Since we are running an agent through one domain, the process is relatively simple. But what If we want to do this same process against multiple domains with, for example, the port 80 opened? Faraday-cli won’t allow us to search for subdomains, but we came up with a one-liner that is super easy to understand, even when it looks complex.
| $ faraday-cli host list –port 80 -w demo_faraday -j | jq ‘.[2].value.hostnames’ | sed ‘s/[“,]//g’ | sed ‘1d;$d’ | tr -d ‘ ‘ |
This is the explanation of each command:
– Firstly, ask faraday-cli the lists of hosts with port 80 open, and the output in JSON (-j) format
– With jq we will obtain the values of the hostnames associated to those IPs, in a list format.
– The first sed will erase the quotation marks and commas off the list.
– The second sed will erase the first and last line (the values between [ and ])
– The tr will delete the blank spaces.
| testapsnet.vulnweb.com
tetphp.vulnweb.com ec2-44-228-249-3.us-west-2.compute.amazonaws.com tera.vulnweb.com www.test.php.vulnweb.com remus.vulnweb.com restasp.vulnweb.com testap.vulnweb.com blogger.com.vulnweb.com testaspx.vulnweb.com autoconfig.demo.vulnweb.com odincovo.vulnweb.com […] |
There is only one more thing to do, execute the agent for every domain and wait for the results at Faraday platform. We can tie this to the earlier command for it to execute at the same time, like this:
| ➜ faraday-cli host list –port 80 -w demo_faraday -j | jq ‘.[2].value.hostnames’ | sed ‘s/[“,]//g’ | sed ‘1d;$d’ | tr -d ‘ ‘ > /tmp/analyze.txt && for subdomain in $(cat /tmp/analyze.txt); echo ‘{“NAMED_CONFIGURATION”: “Crawl and Audit – Fast”, “TARGET_URL”: “‘$subdomain'”}’ | faraday-cli agent run -a 7 -e burp –stdin -w demo_faraday
Running executor: burpsuite/burp Parameters: {“NAMED_CONFIGURATION”: “Crawl and Audit – Fast”, “TARGET_URL”: “testapsnet.vulnweb.com”} Generated Command: [2616] Running executor: burpsuite/burp Parameters: {“NAMED_CONFIGURATION”: “Crawl and Audit – Fast”, “TARGET_URL”: “tetphp.vulnweb.com”} Generated Command: [2617] |
This might look complicated but wait for the third part. We will take it to the next level with higher language (Python! of course) and how to add an exploitation and reporting phase.
Other links of interest:
Related Posts
Using Faraday API for Vulnerability Management
Within our team, we prefer to focus on specific tasks depending on the type of host and the associated vulnerabilities. Exploiting a…

Good practices in Cybersecurity – Part 3
Good security practices go hand in hand with automation, integration, and collaboration. As dynamic as the threat landscape is, so must our…

Ten years of cybersecurity, a lifetime of hacking.
Faraday was born from the fusion of entrepreneurial spirit and a desire to break staffs. These elements naturally emerged in Federico…