Faraday in the software development process – Travis – Part 3

Introduction
For a while we are explaining to you how to integrate our Faraday instance to our development process of Python applications integrated with Heroku easily. In our last posts, we did this using GitHub Actions and Jenkins Pipelines.(link)
Today we are going to implement this using Travis CI as a CD/CI tool because this is one with good market share.
Previous considerations
As we did in the last post, we are going to assume that you already have a python repository in some git server that is already setup using Heroku. You can read our first post if you want to know how to set this and get more context.
Travis CI is a CD/CI tool that has two versions: The paid version allows us to use private git repositories and the free version allows us only to use public repositories.
We are not going to go deep into the config of each version because each one has a different way to configure it but it is not hard, just read the official documentation. We are going to focus on the .travis.yml file and how must be configured to integrate it with our Faraday instance
Step 1: Creating the .travis.ylm file
The first step is to create a file called .travis.yml in the root of our repository, just as we did with the Jenkinsfile file in our last post. This file will be read by Travis on each push and will allow us to build, test, deploy our application and upload the result to our Faraday instance.

When you finish it you can see your build in Travis. If all went ok, you will see something like the following:
Once the file is created, we need to write the following in it:
language: pythonservices:- dockerpython:- '3.9'env:- PROJECT=faraday-vmpipelinesbefore_install- docker pull owasp/zap2docker-stable- docker build https://github.com/flopezluksenberg/docker-faraday-report-uploader.git#bandit -t faraday-uploaderscript:-
Let’s explain what means each line written in previous code block:
– The first line is pretty clear: this is telling to Travis that we are going to build an application written in Python
– The services section allows us to tell Travis that our execution flow will require some external service while it is executing our task like mongodb, redis, etc. In our case we are going to use docker because we need it to run zap later.
– Under the python section we are going to set the python version. In this case the version is 3.9
– The env section allows us to specify environment variables that we need to use during execution. In our case we are going to create the PROJECT variable because we need it to build the workspace name in our Faraday instance later.
– In the before_install section we tell Travis what needs to be done before installing our dependencies. In our case we are using this section to pre-setup the docker images that we will use later.
– The script section is the most important in this file. Here we are going to write each step to be executed by Travis sequentially. You will notice that is pretty similar as we did in our last posts using Github Actions and Jenkins Pipelines
Note: All sections before script are necessary for general setup. In our case the dependencies of our repository will be installed automatically because we said to Travis that the language to be used is python so Travis will find the requirements.txt file to install the required dependencies before execute the script section
Step 2: Defining the script section
As we said, the script section is the most important because here is where Travis will execute each line of our building process sequentially. Hopefully All the environments were set up in the previous sections so we can only focus on the execution sequence.
As we did in the previous post, we will run bandit over our code, we will deploy our app in Heroku, we will run a remote scan using Zap over our just deployed app and we will finish this process uploading the report status to our Faraday instance.
language: python
services:
- docker
python:
- '3.9'
env:
- PROJECT=faraday-vmpipelines
before_install
- docker pull owasp/zap2docker-stable
- docker build https://github.com/flopezluksenberg/docker-faraday-report-uploader.git#bandit -t faraday-uploader
script:
- bandit -r $TRAVIS_BUILD_DIR -f xml -o $TRAVIS_BUILD_DIR/flaskapp_faraday_bandit.xml --exit-zero
- git remote rm heroku || true
- git remote add heroku https://heroku:$HEROKU_API_KEY@git.heroku.com/$HEROKU_APP_NAME.git > /dev/null
- git push heroku HEAD:master -f
- export CURRENT_DATE=$(date +'%Y-%m-%d')
- docker run -u root -v $TRAVIS_BUILD_DIR:/zap/wrk/:rw --network=host -t owasp/zap2docker-stable zap-baseline.py -t $ZAP_SCAN_URL -x flaskapp_faraday_zap.xml || true
- docker run --name faraday-uploader --rm -v $TRAVIS_BUILD_DIR:$TRAVIS_BUILD_DIR -e HOST=$FARADAY_URL -e USERNAME=$FARADAY_USERNAME -e PASSWORD=$FARADAY_PASSWORD -e WORKSPACE=$PROJECT-$CURRENT_DATE-$TRAVIS_BUILD_NUMBER -e FILES=$TRAVIS_BUILD_DIR/flaskapp_faraday_bandit.xml faraday-uploader
- docker run --name faraday-uploader --rm -v $TRAVIS_BUILD_DIR:$TRAVIS_BUILD_DIR -e HOST=$FARADAY_URL -e USERNAME=$FARADAY_USERNAME -e PASSWORD=$FARADAY_PASSWORD -e WORKSPACE=$PROJECT-$CURRENT_DATE-$TRAVIS_BUILD_NUMBER -e FILES=$TRAVIS_BUILD_DIR/flaskapp_faraday_zap.xml faraday-uploader
Let’s read step by step of previous code block to understand what we did on the script section:
– In the first line we are running bandit over our repository. This is not different in comparison with the previous posts.
– The following three steps are used to setup and deploy our app to Heroku. Again, we did it equally as we did in our previous posts. Here it is important to notice the custom environment variables called $HEROKU_API_KEY and $HEROKU_APP_NAME. We will explain later how to declare custom variables in Travis.
– Then we create a variable to store the current date because we will need later to create the workspace in our Faraday instance. The variable name is $CURRENT_DATE.
– Then we use docker. The first docker run is to scan and identify vulns on our deployed app using Zap. Please notice that we are using another custom environment variable called $ZAP_SCAN_URL.
– When the previous scan finishes we just need to upload both generated reports to our Faraday instance. This is not different in comparison as we did in the previous posts because docker let us do it easily. Notice that we have used two environment variables provided by Travis and some custom environment variables too. The Travis environment variables are the following:
– $TRAVIS_BUILD_DIR: This is pretty clear, it is the build dir that Travis is using to run the task
– $TRAVIS_BUILD_NUMBER: This variable tells us what running number is the current one.
The custom environment variables are the following:
– $FARADAY_URL: This is our Faraday instance url.
– $FARADAY_USERNAME: Faraday username that will upload the reports
– $FARADAY_PASSWORD: Faraday password of the previous username that will upload the reports
– $PROJECT: We have defined this environment variable in the env section previously. This is used to create the workspace name.
– $CURRENT_DATE: We have created this variable previously in the script section. This returns the day with the following format yyyy-MM-dd.
Note: We are not going to go deep here because we’ve covered a lot in the previous posts. If you can’t follow this post please go to read the previous ones to get more context.
Step 3: Creating the custom environment variables in Travis
We already set up the .travis.yml file but to get a successful build we still need to set up the custom environment variables that we have used previously.
To do this, we need to go to the settings of our repository through the Travis website (doesn’t matter what version you have). Once inside this, you need to find the Environment Variables section and add all the variables that we used previously one by one.
The Travis UI is pretty simple so we are not going to go deep here. It is important to notice that you can set variable values by branch, so you could set up different Faraday instances based on the branch.
When you finish it you can see your build in Travis. If all went ok, you will see something like the following:

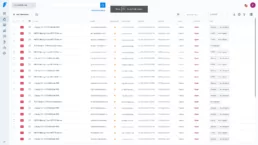
And that ‘s all. Now you can go to your Faraday instance and check the new workspace as we did in the previous posts.

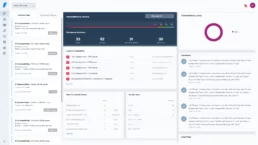
If you enter to the Status Report section you can see the detected vulns:
Conclusions
As you can see, this implementation was pretty easy. In addition you can see that the steps to set up the environment were pretty similar to Jenkins Pipelines and GitHub Actions.
Related Posts

Faraday Security v5.10 & v5.11: Latest Enhancements for Faster Threat Detection
We’re thrilled to kick off the year with a series of enhancements and new features for our vulnerability management platform! One of the…

CVSS v4: What’s New and Why It Matters for Your Vulnerability Management
In the ever-evolving landscape of cybersecurity, staying ahead of potential threats requires robust tools and accurate frameworks for…

Release v5.9.0
At Faraday, our focus is on simplifying the complex and delivering solutions that empower security professionals. With these updates, we’re…