Faraday in the software development process – GitHub – Part 1
Introduction
Usually, software companies see security as an afterthought, which can be generally added when the product is completely operative. This approach could have been debatable in the past. Nowadays, it’s considered a bad decision since it could generate unexpected vulnerabilities in the released source code.

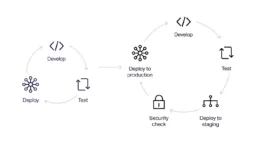
The DevOps concept gives us a new paradigm in our teams, a new role with a developer background focused on continuous integration, combining and automating all the development components several times a day. Automatization, deployment and scalability are day-to-day topics in the DevOps concept. If we combine this role and security, we can find tasks related to DevSecOps which are centered on Software Development Life Cycle (SDLC). This way, we can take the good practices of DevOps and apply them to security checks all together as a continuous process, providing us with the same app automatization level for all the security attributes, functional and non-functional attributes. All of these variables promote a more secure and robust software system.
Step 1: Create a Heroku App
First of all, we need to create a Heroku application. To do this, we recommend following the official website instructions. You can choose other similar services -like DigitalOcean or AWS- but keep in mind that the next GitHub workflow should be modified.
Step 2: Create a GitHub repository with our vulnerable app
We need to create a GitHub repository and upload our vulnerable app there. Please make sure that the manual deployment process with Heroku (or the service you’ve chosen) works in your local. For this example, we’ve used this repository .
Step 3: Create a GitHub Actions workflow
This is the point of this blog! We need to create our GitHub workflow which will be executed following some rules defined by us.
For this blog, we’ve decided to run our workflow when a user executes the push event over the master branch.
So, go to your repository and create this directory tree in the root of it: .github/workflow . Then create a .yml file inside, in our case we created a ci.yml file.

As we said before, first we need to define our workflow name and the trigger event.
name: CIon:
  push:
    branches:
     - master
As we said before, first we need to define our workflow name and the trigger event.
jobs:
  build:
    runs-on: ubuntu-latestscan:
  needs: [build]
  runs-on: ubuntu-latestupload:
 needs: [scan]
 runs-on: ubuntu-latest
We’ve defined 3 jobs: build, scan and upload, and all of them run over a ubuntu-latest image.
GitHub Actions execute all the jobs at the same time, but for this example we need to execute them sequentially. To do this, we use the property needs. So, the scan job has the property needs: [build] and the upload job has the property need: [scan]. This way we can assure that they run in a sequential order.
Step 3.1: Defining the Build job
build:
 runs-on: ubuntu-lateststeps:
 - uses: actions/checkout@v1- name: Use Python
   uses: actions/setup-python@v2
   with:
     python-version: ‘3.x’
     architecture: ‘x64’- name: Install dependencies
   run: |
     python -m install — upgrade pip
     pip install -r requirements.txt- name: Run Bandit (Python code analyzer)
   run: bandit -r . -f xml -o flaskapp_faraday_bandit.xml || true- name: Upload Bandit Report
   uses: actions/upload-artifact@v2
   with:
     name: bandit-report
     path: flaskapp_faraday_bandit.xml- name: Add Remote Origin
   run: |
     git remote add heroku https://heroku:${{ secrets.HEROKU_API_KEY }}@git.heroku.com/${{ secrets.HEROKU_APP_NAME }}.git- name: Deploy to Heroku
   run: git push heroku HEAD:master -f
The first action to execute is actions/checkout@v1. This will download our repository in the assigned workspace by GitHub.
The next step declares a Python 3 environment and installs the repository dependency using the file requirements.txt. This file has Bandit as dependency so we can use it now.
Then we run Bandit. This will create a report in xml format with the name flaskapp_faraday_bandit.xml. For Faraday it’s important to pay attention to the suffix _faraday_bandit.xml, because it will be used to recognize the plugin report when we upload it to our Faraday instance.
Once Bandit has finished, we need to upload the generated report to GitHub using actions/upload-artifact@v2. This action combined with actions/download-artifact@master are the mechanisms provided by GitHub Actions to share outputs between jobs.
The last two actions are the Heroku deployment. An important note here is that we’ve used the variables secrets.HEROKU_API_KEY and secrets.HEROKU_APP_NAME. Those variables can be defined in the Secrets section over the Settings tab of our GitHub Repository:
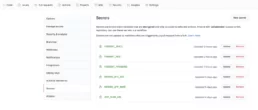
By declaring these secret variables, we can avoid pushing sensitive information directly in our workflow file.
Step 3.2: Defining the Scan job
scan:
  needs: [build]
  runs-on: ubuntu-latestcontainer:
    image: owasp/zap2docker-stable
    options: — user root -v ${{ github.workspace }}:/zap/wrk/:rwsteps:
   - name: Run Zap Baseline Scan
     run: zap-baseline.py ${{ secrets.ZAP_SCAN_URL }} -x zap-report.xml || echo 0- name: Upload Zap Report Artifact
    uses: actions/upload-artifact@v2
    with:
      name: zap-report
      path: zap-report.xml
This job will run a simple scan over our recently deployed vulnerable app.
As you can see, we’ve used a dockerized version of OWASP Zap. For this reason, we need to choose the docker image and declare some options.
Then, we run the scan and save the report with the name zap-report.xml.
Finally, we upload the report as we did with the Bandit report in the build job.
Step 3.3: Defining the Upload job
upload:
  needs: [scan]
  runs-on: ubuntu-latestcontainer:
    image: python:3.9.1
    options: — user root -v ${{ github.workspace }}:/reports:rwsteps:- name: Get current date
    id: date
    run: echo “::set-output name=date::$(date +’%Y-%m-%d’)”

  - name: Download Zap Report Artifact
    uses: actions/download-artifact@master
    with:
     name: zap-report
     path: zap-report- name: Download Bandit Report Artifact
     uses: actions/download-artifact@master
     with:
       name: bandit-report
       path: bandit-report- name: Upload Reports to Faraday
     run: |
       pip install faraday-cli
       faraday-cli auth -f ${{ secrets.FARADAY_HOST }} -u ${{ secrets.FARADAY_USERNAME }} -p ${{ secrets.FARADAY_PASSWORD }}
          faraday-cli create_ws ${{ github.event.repository.name }}-${{ steps.date.outputs.date }}-${{ github.run_number }}
          faraday-cli process_report -w ${{ github.event.repository.name }}-${{ steps.date.outputs.date }}-${{ github.run_number }} /reports/bandit-report/flaskapp_faraday_bandit.xml
          faraday-cli process_report -w ${{ github.event.repository.name }}-${{ steps.date.outputs.date }}-${{ github.run_number }} /reports/zap-report/zap_report.xml
In this job, we are going to upload both generated reports to our Faraday instance.
To do this, we need to use the library faraday-cli that can be installed easily using pip command.
So, we defined the Upload job to work inside a docker image with Python 3 in order to allow us to install faraday-cli easily later.
Then we generated a variable saving the current date with the format YYYY-mm-dd. This variable will be used for the workspace name in our Faraday instance.
Now, we need to download both reports generated in the previously executed jobs using the actions/download-artifact@master action.
Lastly, we need to install faraday-cli and then perform an authentication, create a workspace and process our reports. This last step uses the other declared variables in the Secrets section (previously mentioned) and uses some GitHub context variables too.
The workspace name format will be <repository-name>-<date>-<github-running-number>, so for example it can be: faraday-pipelines-2020–11–03–68.
Important Note: Faraday has GitHub Custom Action available which allows you to process the reports too. However, this is not mandatory. In case you want to use this custom action, the Upload Job should be defined as follows:
upload:
 needs: [scan]
 runs-on: ubuntu-lateststeps:name: Get current date
 id: date
 run: echo “::set-output name=date::$(date +’%Y-%m-%d’)”- name: Download Zap Report Artifact
   uses: actions/download-artifact@master
   with:
     name: zap-report
     path: zap-report- name: Download Bandit Report Artifact
   uses: actions/download-artifact@master
   with:
     name: bandit-report
     path: bandit-report- name: Upload Reports to Faraday
   uses: infobyte/gha-faraday-report-uploader@main
   with:
     host: ${{ secrets.FARADAY_HOST }}
     username: ${{ secrets.FARADAY_USERNAME }}
     password: ${{ secrets.FARADAY_PASSWORD }}
     workspace: ${{ github.event.repository.name }}-${{ steps.date.output.date }}-${{ github.run_number }}
     files: bandit-report/flaskapp_faraday_bandit.xml zap-report/zap-report.xml
After commiting and pushing the changes with our brand new ci.yml file, we can see the running result clicking on the tab Actions of our GitHub Repository.
If you want, you can download the raw reports generated by Bandit and OWASP Zap (they’re attached to the action result when you use the actions/upload-artifact@v2).
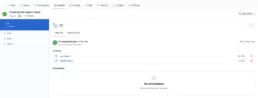
Now, if you look into your Faraday instance, you should see your new workspace created in the previous GitHub Action running this way:

Finally, you can see the dashboard workspace:
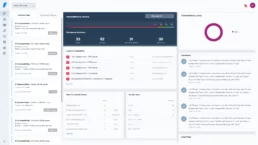
As you can see, several vulns were found. These vulnerabilities can be easily managed as usual with Faraday, as you can see in the following status report image:

As you can see, it’s really easy to integrate Faraday with our CI/CD feature using a few tools.
As mentioned in the introduction, keeping our apps integrated with Faraday will allow us to ease the security team’s work in the company, allowing us to detect earlier security bugs that could be released in the production version. All of this by just adding simple middle steps in the CI/CD process.
This example has been created focusing on GitHub Actions, but can be extended for other CI/CD tools like Travis CI, Jenkins, Bitbucket Pipelines, among others.
Last but not least, for this example we used only two reports, but you can use all the scanners you’d like because Faraday is compatible with a large list of reports. The only limit is your imagination!
Other papers Integrating Faraday click here
Useful links
Example used repo + Script import_scan.py
how to deploy a python’s application in Heroku
How to deploy a flask application in heroku using GitHub Actions
Download all of our DevSecOps papers right here
Related Posts

¿Tu empresa esta preparada para la nueva ley de ciberseguridad de Chile?
Desde este año entró en vigencia una ley modelo de ciberseguridad en Chile. La tomamos como referencia para desarrollar medidas clave que…

Release v5.14
Welcome to an enhanced version of the Faraday Vulnerability Management Platform. This is a quick but juicy release note where we are proud…

Automation and Pentesting: Use AI and Open-Source Tools
This article aims to combine automation and pentesting methodologies in a practical way, using artificial intelligence and multiple…