Bypassing certificate pinning with Gabriel Franco

#Mobilesecurity
Many apps implement a security feature called Certificate Pinning, creating some problems when trying to intercept the traffic between the application and the server. Today, we’ll cover the fundamentals of Certificate PInning and give some examples of how to bypass it using an Android mobile.
Certificate pinning is a security measure that protects your online communication by establishing a trusted connection between your device and a specific web or service. It verifies the digital certificate presented by the server to ensure it matches a pre-defined set of trusted credentials. This way, even if attackers obtain a fraudulent certificate, they won’t be able to intercept your data.
Before you decompile and modify something, you can open it with jadx:
If I want to decompile:
apktool d test.apk
In res/xml, under Resources in JADX, I didn’t find any network_security_config directive, so I have two ways to go:
Decompile the app, add it by hand, compile and sign the app and then install it on the device.
Install the burp certificate, but at the system level.
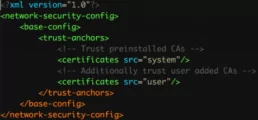
- A) First I decompile and I’m going to create a new file called network_security_config in the res/xml/ path:
<?xml version=”1.0″ encoding=”utf-8″?>
<network-security-config>
<base-config>
<trust-anchors>
<certificates src=”user”/>
<certificates src=”system”/>
</trust-anchors>
</base-config>
</network-security-config>
Also, I have to add the directive in the AndroidManifest.xml file:
<application android:allowBackup=”false” android:networkSecurityConfig=”@xml/network_security_config” android:appComponentFactory=”androidx.core.app.CoreComponentFactory” android:icon=”@mipmap/ic_launcher” android:label=”@string/app_name” android:name=”com.lucyapp.MainApplication” android:requestLegacyExternalStorage=”true” android:theme=”@style/AppTheme”>
<activity android:configChanges=”keyboard|keyboardHidden|orientation|screenSize|uiMode” android:label=”@string/app_name” android:launchMode=”singleTask” android:name=”com.lucyapp.MainActivity” android:screenOrientation=”portrait” android:windowSoftInputMode=”adjustResize”>
Once ready, I start to compile the app:
apktool b test => where TEST is the app’s decompiled folder. The resulting app will be in the folder test/dist/test.apk
To sign it, I’m going to create a key:
keytool -genkey -v -keystore my-release-key.keystore -alias gabiTEST -keyalg RSA -keysize 2048 -validity 10000 => change gabiTEST to whatever you want, same as keystore name, mine in this case is my-release-key.keystore. The latter will be saved in the folder where everything is running.
Now to sign it:
jarsigner -verbose -sigalg SHA1withRSA -digestalg SHA1 -keystore my-release-key.keystore test/dist/test.apk gabiTEST
To see that everything went well, you can run:
jarsigner -verify -verbose -certs test/dist/test.apk
[…]
jar verified.
Warning:
This jar contains entries whose certificate chain is invalid. Reason: PKIX path building failed: sun.security.provider.certpath.SunCertPathBuilderException: unable to find valid certification path to requested target
This jar contains entries whose signer certificate is self-signed.
The SHA1 digest algorithm is considered a security risk. This algorithm will be disabled in a future update.
The SHA1withRSA signature algorithm is considered a security risk. This algorithm will be disabled in a future update.
This jar contains signatures that do not include a timestamp. Without a timestamp, users may not be able to validate this jar after any of the signer certificates expire (as early as 2048-10-19).
The signer certificate will expire on 2048-10-19.
Sometimes the app is not aligned, so you have to align it:
/Users/0x1gab/Library/Android/sdk/build-tools/29.0.2/zipalign -v 4 test/dist/test.apk test_aligned.apk
Now, all that remains is to install:
~/D/c/1 ❯❯❯ adb install test/dist/test.apk
Performing Streamed Install
Success
- B) To install the burp certificate as SYSTEM, we are going to do this:
Go to BURP and download the export certificate in DER format.
Convert it to PEM format: openssl x509 -inform DER -in cert.der -out burp.pem
Get the hash value of the subject, ask Cesar what that is, and rename the certificate with that value:
openssl x509 -inform PEM -subject_hash_old -in burp.pem |head -1 =>> 9a5ba575 mv burp.pem HASH.o =>> mv burp.pem 9a5ba575.o
Now, since this is system, we are going to have to mount the filesystem in RW so that we can do the push to where Android saves the system certificates, because otherwise this error will appear:
~/D/c/1 ❯❯❯ adb push 9a5ba575.o /system/etc/security/cacerts
adb: error: failed to copy ‘9a5ba575.o’ to ‘/system/etc/security/cacerts/9a5ba575.o’: remote couldn’t create file: Read-only file system
9a5ba575.o: 0 files pushed. 0.2 MB/s (1375 bytes in 0.006s)
Sometimes, due to Android versions, even if I mount the FS as RW, I won’t be able to copy it. Therefore, instead of mounting the entire filesystem, what can be done is to mount only the partition that I want to write:
adb shell su -c “‘mount -o rw,remount /system'” => OK ~/D/c/1 ❯❯❯ adb push 9a5ba575.o /system/etc/security/cacerts/9a5ba575.o => 1 file pushed. 0.4 MB/s (1375 bytes in 0.003s) OK
Finally, I give it 644 permissions and reboot:
- chmod 644 /system/etc/security/cacerts/<subject_hash>.0
- reboot
If everything goes well, we shouldn’t have any certificate pinning problems 😀
In case there is something that we have not seen (which was what happened to me), we have several options:
- Touch the source code of the APK by hand, delete the Certificate Pinning entries and compile again.
- Use some framework, like XPOSED.
- Use Frida.
In my case, XPosed didn’t work for me. Likewise, the APK is downloaded to the cell phone from: https://repo.xposed.info/module/de.robv.android.xposed.installer
On the other hand, Frida. To install it:
- Frida server is downloaded => https://frida.re/docs/android/
- adb push frida-server /data/local/tmp/
- adb shell “chmod 755 /data/local/tmp/frida-server”
- adb shell “/data/local/tmp/frida-server &”. => Service running OK, returns nothing.
Frida has many scripts already built for many things. In my case I used one for SSL Unpinning. For that, first I start the server and then from my machine I run Frida:
frida –codeshare sowdust/universal-android-ssl-pinning-bypass-2 -U com.lucyapp
Related Posts
Using Faraday API for Vulnerability Management
Within our team, we prefer to focus on specific tasks depending on the type of host and the associated vulnerabilities. Exploiting a…

Good practices in Cybersecurity – Part 3
Good security practices go hand in hand with automation, integration, and collaboration. As dynamic as the threat landscape is, so must our…

Ten years of cybersecurity, a lifetime of hacking.
Faraday was born from the fusion of entrepreneurial spirit and a desire to break staffs. These elements naturally emerged in Federico…