faradaysecBy faradaysec|February 4, 2025|19 Minutes

Introducing Doggie: Your Modular CAN Bus – USB Adapter

At Faraday, we are passionate about advancing the field of cybersecurity. One of our key areas of focus is Car Hacking Research. As vehicles become increasingly connected and reliant on electronic systems, understanding and securing these systems is more relevant than ever.

To make automotive cybersecurity research more accessible and affordable, we developed Doggie, an open-source and modular CAN Bus – USB adapter. Whether you’re a hobbyist, researcher, or professional, Doggie is designed to simplify working with CAN Bus networks, enabling secure exploration and development in the automotive space.

The Importance of CAN Bus in Vehicles

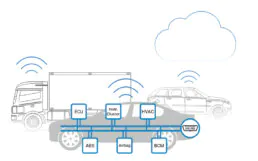
Before delving into Doggie, let’s briefly discuss the Controller Area Network (CAN) Bus, the backbone of modern vehicle communication. CAN Bus connects critical electronic control units (ECUs) for the engine, brakes, transmission, and even some comfort, information display, and entertainment systems. This network enables seamless communication between these systems, ensuring the vehicle operates efficiently and safely.

For cybersecurity professionals and enthusiasts, CAN Bus represents a critical area for exploration. It offers insights into how vehicles work and the opportunity to secure them against potential threats.

Introducing Doggie

Doggie is a modular, flexible, open-source adapter that bridges the gap between a computer and a CAN Bus network using USB. Built with affordability and adaptability in mind.

Its compatibility with SocketCAN on Linux, Python-can, and other slcan-compatible software ensures seamless integration with existing CAN Bus analysis, sniffing, and injection tools. Doggie also supports ISO-TP, making it perfect for standard and advanced CAN Bus applications. Whether running diagnostics, experimenting with custom in-car functionalities, or performing penetration tests, Doggie provides the tools you need to succeed.

The project emphasizes modularity, allowing users to select from various hardware configurations with different microcontrollers and CAN transceivers. This makes it accessible and cost-effective. Doggie adapts to your needs whether you’re using a microcontroller’s built-in CAN controller or an MCP2515 (SPI to CAN) module. 

You can create your own DIY Doggie only by choosing a microcontroller, a CAN interface, and a Serial interface combination. Six possible configurations are available today, and more hardware support is coming!

Microcontrollers:

  • Raspberry Pi Pico (RP2040)
  • STM32F103C8 (Bluepill)
  • ESP32

CAN Controllers:

  • Built-in CAN controllers
  • MCP2515 (SPI to CAN)

USB/Serial Connectivity:

  • Microcontroller USB (native USB support)
  • UART with USB Bridge


Doggie’s modular nature and the fact that it was written purely in Rust with hardware abstraction by design make developing new hardware support easy and fast. Thus, if the hardware you already own or prefer is not supported yet, consider adding support for them. It should take a short time and little effort.

Practical Application: Using Doggie in Real-World Scenarios

Doggie isn’t just a tool for research. It’s a versatile companion for real-world automotive applications. Here are some practical scenarios where Doggie can shine:

1. Vehicle Diagnostics

Accessing real-time diagnostic information, including engine parameters, sensor readings, and fault codes. Doggie enables you to interact with the vehicle like a professional-grade diagnostic tool.

2. Customization

Adding new functionalities to your vehicle by sending custom CAN messages. From controlling actuators to integrating new sensors, the possibilities are endless.

3. Security Assessments

Leveraging Doggie to perform penetration testing and vulnerability analysis on vehicle networks. Identify weak points and explore ways to secure critical systems.

Future Work

At Faraday, we are committed to expanding Doggie’s capabilities to meet the growing needs of the automotive security research community. Looking ahead, our plans include:

1. Broader Hardware Support

Doggie’s modularity is one of its defining strengths, and we aim to make it even more versatile. We are working on extending support to additional microcontrollers, ensuring that users can leverage various platforms for their projects.

2. Wireless Capabilities

We plan to incorporate wireless communication features to enhance Doggie’s flexibility and ease of use. By leveraging the Bluetooth and Wi-Fi capabilities of microcontrollers like the ESP32, Doggie will enable researchers to interact wirelessly with CAN Bus networks, opening up new possibilities for remote diagnostics, testing, and experimentation.

3. A Dedicated CAN Bus Hacking Edition

We are also developing a new version of Doggie specifically tailored to the needs of automotive security researchers. This edition will include built-in features to facilitate various CAN Bus attacks, providing researchers with a powerful toolset for studying and exploiting vulnerabilities.

These enhancements will continue to make Doggie an essential tool for anyone looking to explore, understand, and secure CAN Bus systems. We’re excited about the possibilities and can’t wait to share these new developments with the community.

Conclusion

Doggie represents Faraday’s commitment to empowering the community with tools that democratize automotive cybersecurity research. Whether you’re a seasoned professional or a newcomer to car hacking, Doggie provides a low-cost, versatile solution to explore CAN Bus networks and beyond.

Get Involved

Doggie represents Faraday’s commitment to empowering the community with tools that democratize automotive cybersecurity research. Whether you’re a seasoned professional or a newcomer to car hacking, Doggie provides a low-cost, versatile solution to explore CAN Bus networks and beyond.

Our Experience at the Car Hacking Village H2HC

Our previous post introduced Doggie, an open-source and modular CAN Bus – USB adapter designed to simplify working with CAN Bus networks, enabling secure exploration and development in the automotive space.

Last month, Doggie took the stage at the Car Hacking Village during the H2HC conference on December 13th and 14th in São Paulo. This exciting village featured various presentations and workshops exploring the world of automotive security. The Faraday team showcased Doggie in a uniquely interactive way, allowing attendees to dive into CAN Bus exploration hands-on.

To create an engaging experience, we developed a simulated environment with a working CAN Bus network, enabling participants to interact using Doggie or their own hardware. This environment consisted of two main components:

  1. A PC running the CARLA simulator
    CARLA is a highly realistic car simulator often used to train and test autonomous vehicle algorithms. In our setup, CARLA connected to the CAN Bus via Doggie.
  2. A Raspberry Pi with a game controller
    The Raspberry Pi acted as a bridge between the controller and the CAN Bus. It interpreted button presses on the controller, translated them into control commands, and used Doggie to send them over the CAN Bus.

The communication flow worked like this:

  • A user pressed buttons on the controller, which the Raspberry Pi interpreted as commands.
  • The Raspberry Pi sent these commands over the CAN Bus via Doggie.
  • The PC received the commands, interacted with the CARLA simulator, and executed the corresponding actions (e.g., throttle, steering, opening doors, or switching lights).

In short, we created a CAN Bus controller and a CAN Bus interface for the CARLA simulator and seamlessly connected them.

Participants had the opportunity to control the simulated car using the controller while also experimenting with the CAN Bus. They could:

  • Reverse engineer messages on the bus.
  • Inject commands into the bus to manipulate the simulator.
  • Cause the car to crash while another person was driving.
  • Unlock the simulated car’s doors.
  • Explore countless other creative scenarios.

We deliberately kept the messages simple to ensure that even beginners could follow along, understand the basics of CAN Bus communication, and learn with us in real-time.

The setup was a huge success, attracting many visitors eager to learn, chat, and play. From reverse engineering enthusiasts to curious beginners, everyone left with a deeper understanding of CAN Bus and Doggie’s potential.

For those who couldn’t attend, we’ve made the entire setup available online! You can find the repository with all the scripts and tools you need to recreate the experience yourself.

Case Study: Unlocking a Car Using Doggie

In our last two posts, we introduced our open-source and modular CAN Bus – USB adapter called Doggie and shared our experience at the Car Hacking Village of the H2HC conference, where we used Doggie to show attendees the inner workings of CAN Bus Networks.

This post will explore a practical use case to demonstrate Doggie’s power in automotive security research. Imagine you need to unlock a vehicle by sending the correct sequence of CAN messages. With Doggie and tools like Python-can, can-utils, or custom scripts, you can sniff unlocking messages, replay them, and even experiment with manipulating the system for security analysis.

In this case study, we’ll walk through how to use Doggie to sniff and inject messages into the CAN Bus of a 2010 Jeep Liberty. The setup consists of Doggie with the RP2040 and MCP2515 configuration, which provides the interface between the car’s CAN Bus and your computer.

Step 0: CAN Bus

Introduction to CAN Bus and Message Structure

Before diving into the practical case study, it’s important to understand the basic structure of a CAN Bus frame. A CAN frame typically consists of several components:

  1. Start of Frame – Marks the beginning of the message.
  2. Identifier (ID) – A unique ID for the message, which determines its priority in the bus.
  3. Control Field – Includes the length of the data field.
  4. Data Field – Contains the actual message data, which can range from 0 to 8 bytes.
  5. CRC – A checksum used to detect errors in the message.
  6. ACK – The acknowledgment field is where the receiving nodes confirm the successful reception of the message.
  7. End of Frame – Marks the end of the message.

For this post, we won’t discuss the intricacies of how the CAN Bus works at the electrical level or explore its protocol in depth. Instead, we will focus on the practical use of Doggie for sniffing, analyzing, and injecting messages, leaving detailed electronics and hardware explanations aside. Our goal is to demonstrate how to use Doggie to interact with CAN Bus networks. For a more profound exploration of the CAN Bus protocol, we recommend consulting additional resources on the subject.


Step 1: Research and Documentation

Before jumping into the physical connections, the first step is to gather relevant documentation about the car, especially the “Repair Manual” and the “Wiring Diagram.” These documents may not be perfectly detailed, but they provide crucial information on the car’s electrical system, modules, and communication buses. In this case, we found a helpful diagram that outlines the key CAN buses in the Jeep Liberty.

As shown in the image, the car contains three primary CAN buses:

  • CAN C Bus
  • Diagnostic CAN C Bus
  • CAN Interior Bus

Each bus operates at its own speed and communicates with different modules. A key piece of information here is that all the buses connect to the TIPM (Totally Integrated Power Module), also known as the Common Gateway for Communication (CGW). This module acts as a gateway to manage communication between different buses, ensuring that messages from OBD2 diagnostic systems are isolated from other buses, such as those handling door locks or brakes.

Step 2: Finding the Right Bus and Module

We focus here on the Driver Door Module (DDM) and Passenger Door Module (PDM). According to the diagram, both modules are connected to the CAN Interior Bus. To access this bus, we needed to locate an appropriate connection point. We identified that the seat memory module is also connected to this bus and conveniently located under the seat.

We then used the Repair Manual to identify CAN High and CAN Low wires. The diagram showed that the white and orange cable is CAN Low, and the white and gray cable is CAN High.

To validate our connection further, we used an oscilloscope to check the signals on the bus. We connected the oscilloscope to the CAN High and CAN Low lines to ensure the signals were correct for CAN Bus communication.

Step 3: Setting Up Doggie

Once the hardware connections were in place, we connected Doggie to the CAN bus and the computer. First, we installed the can-utils package on Linux:

$ sudo apt-get install can-utils


Next, we set up the CAN interface for Doggie. We know from the diagram that the bus operates at 125kbps, so we used the following command to start the slcan daemon and initialize the CAN interface:

# Start the slcan daemon and set up the interface

$ sudo slcand -s4 /dev/ttyUSB0 can0 && sudo ifconfig can0 up


After this setup, we had a CAN interface named can0 that was ready to interact with the car’s bus.

Step 4: Sniffing CAN Messages

We used the cansniffer tool to start sniffing messages on the bus. This tool helps identify interesting messages by highlighting changes in data. This is especially useful during live interactions, such as locking or unlocking the doors.

$ cansniffer -c can0


Once we started sniffing, we triggered events, such as locking and unlocking the doors. In the video, a new message appears with the ID 0x3ED every time we press the lock button. This tells us that 0x3ED is the ID responsible for door lock/unlock commands.

Step 5: Interpreting the Messages

While cansniffer shows data differences, it’s not always the best tool for analyzing message details because it overwrites previous information. Instead, we used candump with an ID filter to focus on the specific messages relevant to locking and unlocking.

$ candump can0,0x3ED

We observed three distinct messages:

  • 0x20: Sent periodically, likely a liveness message.
  • 0x30: Sent when locking the doors.
  • 0x28: Sent when unlocking the doors.

Once we understood the message structure, we could proceed to inject messages.

Step 6: Injecting Messages

To lock or unlock the doors, we used cansend to inject the corresponding message. Here’s how we sent the unlock command:

$ cansend can0 3ED#28

In the demo video, we can see the doors lock and unlock based on the messages we sent.

Trainings, red teaming services, or continuous scanning? We’ve got you covered. 🚀⚡ 

Reach out for more information.