Car Hacking: How to unlock doors with Doggie

In our last two posts, we introduced our open-source and modular CAN Bus – USB adapter called Doggie and shared our experience at the Car Hacking Village of the H2HC conference, where we used Doggie to show attendees the inner workings of CAN Bus Networks.
This post will explore a practical use case to demonstrate Doggie’s power in automotive security research. Imagine you need to unlock a vehicle by sending the correct sequence of CAN messages. With Doggie and tools like Python-can, can-utils, or custom scripts, you can sniff unlocking messages, replay them, and even experiment with manipulating the system for security analysis.
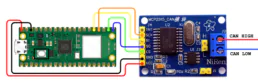
In this case study, we’ll walk through how to use Doggie to sniff and inject messages into the CAN Bus of a 2010 Jeep Liberty. The setup consists of Doggie with the RP2040 and MCP2515 configuration, which provides the interface between the car’s CAN Bus and your computer.
Step 0: Introduction to CAN Bus and Message Structure
Before diving into the practical case study, it’s important to understand the basic structure of a CAN Bus frame. A CAN frame typically consists of several components:
- Start of Frame – Marks the beginning of the message.
- Identifier (ID) – A unique ID for the message, which determines its priority in the bus.
- Control Field – Includes the length of the data field.
- Data Field – Contains the actual message data, which can range from 0 to 8 bytes.
- CRC – A checksum used to detect errors in the message.
- ACK – The acknowledgment field is where the receiving nodes confirm the successful reception of the message.
- End of Frame – Marks the end of the message.
For this post, we won’t discuss the intricacies of how the CAN Bus works at the electrical level or explore its protocol in depth. Instead, we will focus on the practical use of Doggie for sniffing, analyzing, and injecting messages, leaving detailed electronics and hardware explanations aside. Our goal is to demonstrate how to use Doggie to interact with CAN Bus networks. For a more profound exploration of the CAN Bus protocol, we recommend consulting additional resources on the subject.
Step 1: Research and Documentation
Before jumping into the physical connections, the first step is to gather relevant documentation about the car, especially the “Repair Manual” and the “Wiring Diagram.” These documents may not be perfectly detailed, but they provide crucial information on the car’s electrical system, modules, and communication buses. In this case, we found a helpful diagram that outlines the key CAN buses in the Jeep Liberty.
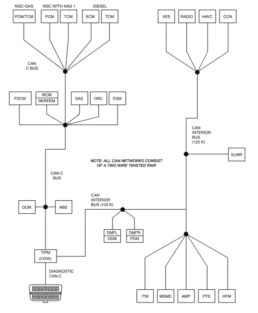
As shown in the image, the car contains three primary CAN buses:
- CAN C Bus
- Diagnostic CAN C Bus
- CAN Interior Bus
Each bus operates at its own speed and communicates with different modules. A key piece of information here is that all the buses connect to the TIPM (Totally Integrated Power Module), also known as the Common Gateway for Communication (CGW). This module acts as a gateway to manage communication between different buses, ensuring that messages from OBD2 diagnostic systems are isolated from other buses, such as those handling door locks or brakes.
Step 2: Finding the Right Bus and Module
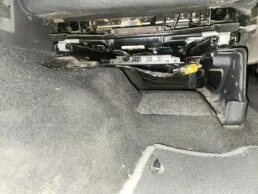
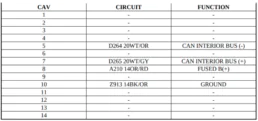
We focus here on the Driver Door Module (DDM) and Passenger Door Module (PDM). According to the diagram, both modules are connected to the CAN Interior Bus. To access this bus, we needed to locate an appropriate connection point. We identified that the seat memory module is also connected to this bus and conveniently located under the seat.
We then used the Repair Manual to identify CAN High and CAN Low wires. The diagram showed that the white and orange cable is CAN Low, and the white and gray cable is CAN High.
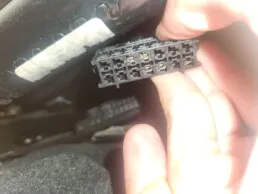
To validate our connection further, we used an oscilloscope to check the signals on the bus. We connected the oscilloscope to the CAN High and CAN Low lines to ensure the signals were correct for CAN Bus communication.

Step 3: Setting Up Doggie
Once the hardware connections were in place, we connected Doggie to the CAN bus and the computer. First, we installed the can-utils package on Linux:
$ sudo apt-get install can-utils
Next, we set up the CAN interface for Doggie. We know from the diagram that the bus operates at 125kbps, so we used the following command to start the slcan daemon and initialize the CAN interface:
# Start the slcan daemon and set up the interface
$ sudo slcand -s4 /dev/ttyUSB0 can0 && sudo ifconfig can0 up
After this setup, we had a CAN interface named can0 that was ready to interact with the car’s bus.
Step 4: Sniffing CAN Messages
We used the cansniffer tool to start sniffing messages on the bus. This tool helps identify interesting messages by highlighting changes in data. This is especially useful during live interactions, such as locking or unlocking the doors.
$ cansniffer -c can0
Once we started sniffing, we triggered events, such as locking and unlocking the doors. In the video, a new message appears with the ID 0x3ED every time we press the lock button. This tells us that 0x3ED is the ID responsible for door lock/unlock commands.
Step 5: Interpreting the Messages
While cansniffer shows data differences, it’s not always the best tool for analyzing message details because it overwrites previous information. Instead, we used candump with an ID filter to focus on the specific messages relevant to locking and unlocking.
$ candump can0,0x3ED

We observed three distinct messages:
- 0x20: Sent periodically, likely a liveness message.
- 0x30: Sent when locking the doors.
- 0x28: Sent when unlocking the doors.
Once we understood the message structure, we could proceed to inject messages.
Step 6: Injecting Messages
To lock or unlock the doors, we used cansend to inject the corresponding message. Here’s how we sent the unlock command:
$ cansend can0 3ED#28
In the demo video, we can see the doors lock and unlock based on the messages we sent.
Doggie represents Faraday’s commitment to empowering the community with tools that democratize automotive cybersecurity research. Whether you’re a seasoned professional or a newcomer to car hacking, Doggie provides a low-cost, versatile solution to explore CAN Bus networks and beyond.
Check out the project at GitHub!
Trainings, red teaming services, or continuous scanning? We’ve got you covered. 🚀⚡
Related Posts

Content-Security Policy (CSP) y cómo (no) confiar ciegamente en ella
El Content-Security Policy (CSP) es una de las defensas más efectivas contra vulnerabilidades del tipo Cross-Site Scripting (XSS) y ataques…

COD4MW Cheat: A Reverse Engineering Adventure
If you enjoy playing online games, you’ve probably heard about cheaters. People tend to have a negative perception of them, and they’re…